The TSGL game programming language, and The Metastructure, a game written in 3044 lines of TSGL, are my entry to the 2025 Langjam Gamejam:
Langjam Gamejam is a 7-day challenge to create a programming language and then use that language to build a game. You set the rules. Be as creative as possible, use any technologies you want, and have fun. There will be prizes to the most creative submissions!
- The hackathon runs for 7 days
- You must design and implement a programming language
- The must design and implement a game using your language
- You can use any language, engine, libraries, and technologies
- You define what a programming language is and what a game is
- Work solo or on a team
- Documentation and instructions are encouraged
- Bonus points: Write a blog post about your language, game, and design process
This is my blog post for bonus points.
Definitions
You will find no definitions here of programming language or game, I'm leaving those to the philosophers and the pedants. What matters is whether my own programming language and game fit the definitions that most people have.
I decided that if TSGL is taken from a text representation, parsed into an AST with imperative and declarative constructs, and that AST is used to generate code in a target language that isn't a trivial one-to-one mapping of the input, then it would be hard to argue that TSGL isn't a language.
In the same way, if my game lets you control a character, explore a world and avoid deadly enemies, then it would be hard to argue that it isn't a game.
Early Design Decisions
A week is hardly enough time to begin implementing a good programming language, so it will have to be a bad one. This turns the design phase into choosing what to sacrifice, and coming up with tricks to make it less painful.
The core design philosophy of TSGL is that a valid TSGL program is also a valid TypeScript program, that many errors in a TSGL program would also be errors in TypeScript, and that many TypeScript auto-completions are relevant for a TSGL program. I even made .ts the extension of TSGL files so that Visual Studio Code would automatically recognize them and run the TypeScript language server:
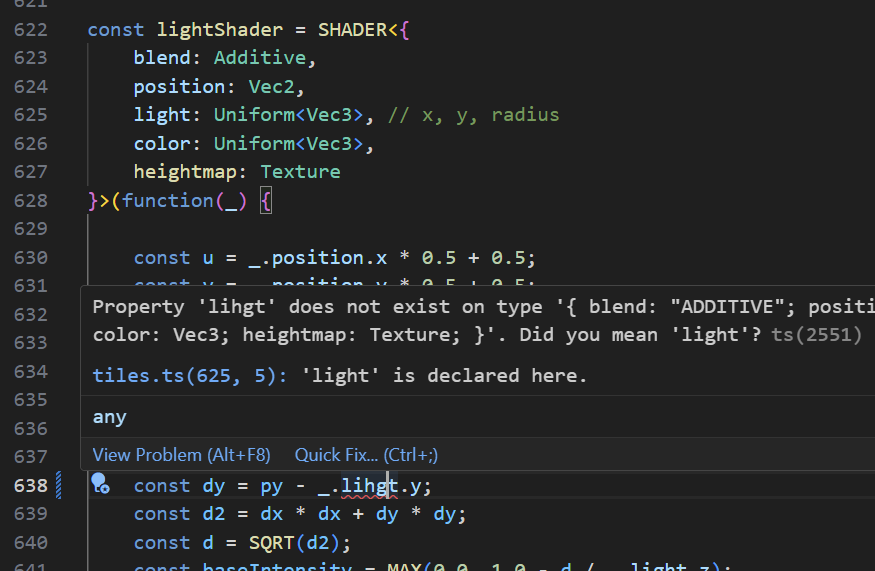
Of course, this is just a trick, and the semantics of TSGL are quite unlike those of TypeScript. There is no way to implement the SHADER function above as a TypeScript function, since it produces WebGL shader code based on its type argument and the body of its function argument, both of which are things TypeScript cannot do.
But why pick TypeScript? Why not have TSGL pretend to be C# code, or OCaml? Because TypeScript lets me configure the behavior of its type system so that errors in TSGL code are reported properly. Of course, TypeScript doesn't advertise the feature as configuring the type system, but what matters is that you can create a global.d.ts file that uses TypeScript's very expressive type system to annotate TSGL constructs. The reason why that type system is so good at describing the weird behavior of an external function, is because it was designed to annotate code written in JavaScript that didn't care about types at all.
I also chose TypeScript as the output language of the compiler. I wanted to create a web game (it's easier to make it portable, and I had an entire WebGL-based helper library available), so my choices were JavaScript, TypeScript, or WASM. I eliminated WASM because it has very poor debugger support. In the end, TypeScript won because it has (again) a strong type system, and being able to quickly validate the correctness of generated code is a huge time-saver when investigating bugs in a compiler.
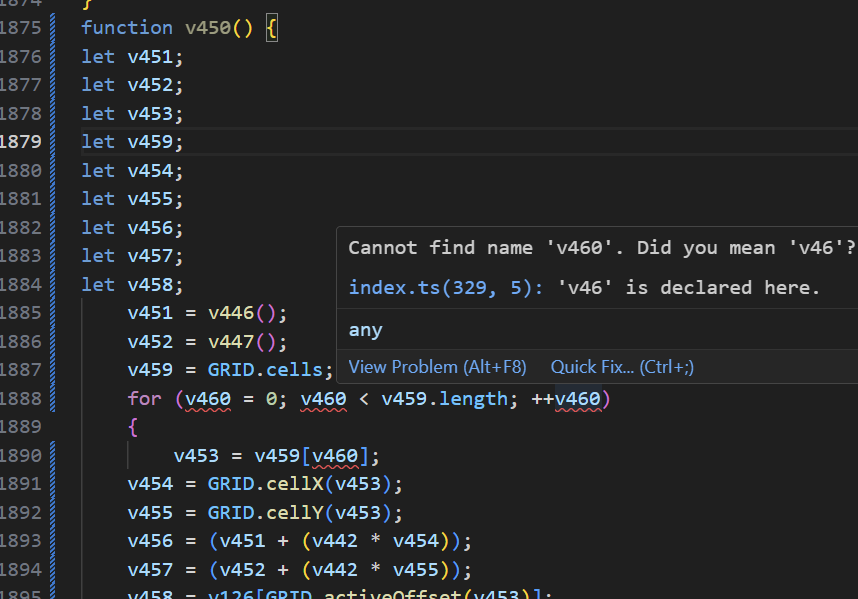
For example, using Visual Studio Code to investigate why my for (const cells of CELLS()) is broken:
Of course, if my input language is almost-TypeScript, and my output language is TypeScript, am I really writing a compiler? So, I set limits on what portions of TypeScript-as-an-output-language I would be able to use. My rules were:
- No memory allocation of any sort. This includes calling constructors, creating object literals, and even concatenating strings.
- No arrays, maps, sets, or other data structures. The only exception was that I could create global typed arrays of a fixed size during initialization.
- No complex control structures. I was only allowed
for(;;),if,elseandreturn. - No direct function calls from TSGL to TypeScript. That is, I couldn't just
importa TypeScript module into TSGL and call its methods. - No straight code copy. All input code had to be parsed into a syntax tree, and from there emitted back as output code.
In the end, TSGL quickly evolved in a direction that made the entire point moot: functions such as TABLE or SHADER need to introspect their type arguments, which is something that TypeScript itself cannot do anyway.
Targeting WebGL shaders as a secondary output language was far less enjoyable, due to a lack of good debugger (though SpectorJs gets an honorable mention) and a much slower feedback loop for type errors.
A 7-day gamejam is hardly the time to explore new technologies, so I decided to combine old technologies that I am good with: pixel shaders, rail-based platformers, procedural generation through wave function collapse, and cellular automata.
A nice benefit of pixel shaders is that I'm very, very bad at pixel art, but I'm quite good at procedural effects. A few low-quality sprites can be made to shine with a bit of dynamic lighting and a huge serving of post-processing effects. The main difficulty of pixel shaders is that they're written in a different language, and there's a lot of boilerplate involved in sticking together all the programs, attributes, buffers, targets, textures, and so on. But writing my own programming language meant all that boilerplate could be hidden behind a nice abstraction.
Wave function collapse is another way of turning a small number of badly drawn tiles into interesting worlds. But the data structures involved in a serious wave collapse algorithm would require a lot of language support, so I decided to go for a simpler version based on cellular automata, where each cell picks its tile based on the surrounding tiles, and if no acceptable tile exists in the tileset, the cell clears one or more of its surrounding cells. This would inevitably cause either long freezes (if I wait for the cellular automaton to solve the wave function constraints) or a glitchy effect (if I draw the tiles while they are in the process of being picked).
This played well into my idea of having an "explore alien locations" kind of game. I am a big fan of the SCP Foundation, Control, the Backrooms, Pacific Drive, I'm on Observation Duty, Otherside Picnic, and so on. In this type of game, having a glitchy room re-arrange its contents in real time would feel like a feature, rather than a technical limitation.
The TSGL compiler is written in C#. I could come up with any number of reasons why TypeScript wasn't good enough, like "bad performance" or "it's too easy to confuse compiler code, input code and output code", but the real reason was Rider, the C# IDE from JetBrains. Expect several paragraphs of me being a Rider fanboy. You have been warned.
I have moved from Visual Studio 2022 to Rider as part of my move from Windows 10 to not Windows 11 Linux. Rider gives significantly more feedback about the code, has more refactoring options and better contextual refactoring suggestions, but that's not where its main advantage lies.
There are three main ways that IDEs can help generate code: auto-completion inserts a token that makes sense at a certain point (such as a variable name, type name or member name) and has existed for decades, LLM code generation slowly produces and/or edits tens to hundreds of lines at a time based on a prompt and has existed for a couple of years, and then there's the middle ground of suggesting a handful of lines based on the context, without having been prompted. Stop typing for a half second, and see what the IDE comes up with.
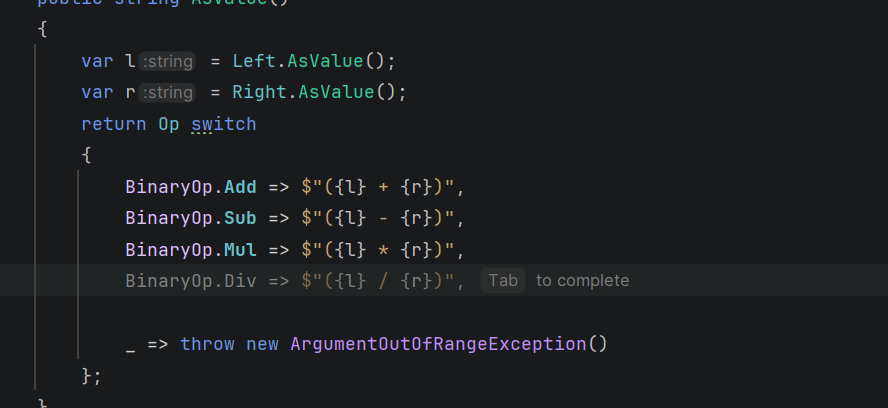
Visual Studio 2022 was mostly able to suggest trivial things, like assigning constructor parameters to fields with the same name, or auto-applying an edit after manually performing it a few times. Rider suggests completions that truly make semantic sense, like mapping the operator / to an enum value BinaryOp.Div. And it's not limited to C#, either: I was surprised to see it suggest valid JavaScript/WebGL code, inside of a C# string literal, and with the GL. prefix I needed on top, while properly applying the meaning of "additive". The last three lines in the example below were suggested by Rider:

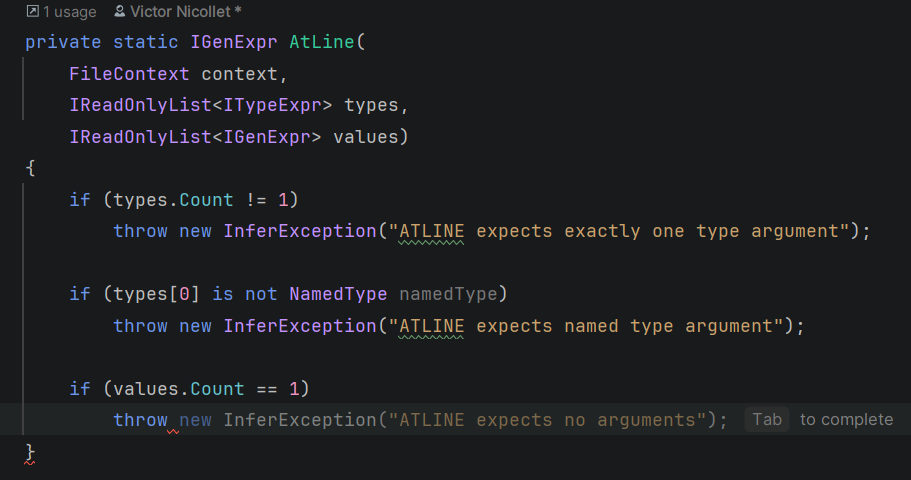
It's also fairly good at producing documentation, and it emits correct exception messages based on the conditions that led to the exception being thrown. This has saved me on multiple occasions, where my condition was wrong and I only noticed when the exception message didn't match my expectation. For example, ATLINE should expect exactly one argument, but I mistyped == 1 instead of != 1 and the suggested exception message was:
The fact that these suggestions are produced without having to write a prompt means they don't need me to get out of my writing-code state and into a prompting-LLM state. Whenever there's a pause in my typing, a suggestion just appears, and I get to accept it or just keep typing to reject it. And I do reject more often than I accept, but it still let me skip hundreds of lines of conventional, uninteresting, boilerplate code in the TSGL compiler.
I also considered vibe coding the compiler, but decided against it: an essential point of a 7-day hackathon is that whatever you implement will be incomplete, and you have to know what parts are missing so that you work around them. One of my shaders contains a hand-unrolled gaussian blur matrix, because I knew that TSGL didn't support for-loops in shaders. If I had vibe-coded the compiler, I wouldn't have known that for-loops weren't supported.
I am quite poor at drawing, but I didn't want to use ready-made sprites, so I took Zegley's 2D animated sprite template and adapted it. I chose designs that could be achieved by using the paint tool on top of the template, and copy-pasting the head, so that I wouldn't have to spend more than a few minutes for each animated character:
For the background, since I'm quite poor at choosing colors, I went for 12×12 tiles with a greyscale aesthetic and relied on the wave function collapse system (and dynamic lighting) to bring it to life. I believe it did a rather good job.
The Implementation
Tokenization
Any good book about compilers will start by tokenizing code-as-plain-text into code-as-individual-tokens, and then parsing those tokens into a code-as-syntax-tree. I didn't want to risk fiddling with a tokenizer or parser generator on a 7-day hackathon, so I went for manual implementations.
A simple tokenizer for a TypeScript-like language can be implemented in 10 minutes: skip all white-space characters, look at the first character of the token, and then read all compatible characters after that. By compatible, I mean that:
[A-Za-z]can be followed by[A-Za-z0-9_][0-9]can be followed by[._a-fA-Fx](to deal with binary and hex).- Single-character operators
?:;.,/%*!cannot be followed by anything, but multi-character operators<>=+-can.
But comments and string literals don't fit this model, so there's a pre-tokenization step that scans the input, looking for // or ", and then replaces their contents with space characters so that the rest of the tokenizer can ignore them. Why replace, instead of erase? Because replacing is more performant (I'm using a Span<char> so overwriting is O(1)) and preserves line/column positions for reporting error messages.
Parsing
I decided on a syntax where the parsing rule to apply in any situation is determined by looking at the next token. A function token means a function definition, an import token means an import statement, and so on. So, I used a recursive descent parser, a fancy word for having dozens functions like ParseImportStatement which assume that the initial token has been read, and parse and returns the entire syntax node, having consumed all the corresponding tokens.
The exception is of course infix operators, which can turn any parser into a hot mess if you expect A + B * C to be parsed as A + (B * C) instead of (A + B) * C. The trick I used is to have the recursive descent parser just collect a soup of sub-expressions and infix operators, a list like A+ ; B* ; C, and then have a separate priority-resolving function take that list and turn it into a proper expression tree. For lack of time, I had to settle for a terribly wasteful downgrade of the Shunting Yard algorithm.
Name Resolution
The main task of the inference step is to find variable, type or function names in the syntax tree, and to either attach some data to that name (when the entity is defined), or retrieve the attached data (when the entity is referenced). At the same time, I wanted to split my code into multiple files (and I had the import * as M from "./path" statement for that), so an export function F would be accessed as F from within its module, and as M.F from other modules.
To keep things simple, I came up with a FileContext class (here) to represent all entities defined in a file so far during the compilation of that file, and then remain as a representation of all entities exported from a file once that file was imported into another. The entities themselves were just an IEntity interface with a Declare method that generates their output code.
I also had to define the built-ins, such as `SHADER` or `GRIDCENTER` or `RANDINT`. Rather than have a huge dictionary of them somewhere (which I would have to update all the time), I opted to make that dictionary empty and mutable, and then the various classes that wanted to expose built-ins would add them to the dictionary during their static initialization (triggered by adding the [ModuleInitializer] on a static method). I believe this made the overall layout of the inference layer simpler, since it was essentially composed of independent plugins like "a shader function" that inserted themselves into a core that was agnostic of their exact details.
First Steps
Step zero was to set up the simplest game engine possible:
STEP(function() {
    LOG("STEP!");
});

RENDER(function() {
    LOG("RENDER!");
});
The STEP function is executed exactly 60 times per second, and the RENDER function whenever requestAnimationFrame tells it that the browser is ready for the next frame. The logic behind calling these functions was a copy-paste from an earlier game, Darklaga.
Step one is to draw a full-screen pixel shader. The background of the game, the "Moonlake", is nothing really fancy. A distance function is used to draw the moon and the glow around it, and the reflection on the sea below is based on a few harmonics time and space with a cut-off to appear only in the vertical band below the moon. The code for it is in background.ts.

The SHADER function is compiled to calls to the various functions in webgl.ts, a file that started out as Darklaga's graphics engine and evolved into my go-to WebGL bindings whenever I have a project that needs 3D rendering. At this point, it supported only vertex attributes, basic arithmetic, and returning a pixel color.
Step two is adding a full-screen post-processing step: the "Video Cassette Recorder" effect in videocassette.ts. I manually re-implemented this 2D noise function from StackOverflow to get the grain effect.
The basic principle for post-processing is that instead of rendering the game to the screen, you render it to an intermediate texture, and then use that texture as input for the post-processing shader. This meant I had to add support for rendering to a texture, and reading from a texture. Instead of having a dedicated function like texture, I decided that in TSGL textures would be functions taking a Vec2 and returning a Vec4:
    // Separate shift for each color channel
    const d = 2.0 / SCREENWIDTH();
    const cc = _.image({ x: MIN(1.0, MAX(0.0, x)), y: uv.y });
    const g = cc.y;
    const rc = _.image({ x: MIN(1.0, MAX(0.0, x + d)), y: uv.y });
    const r = 0.8 * rc.x + 0.2 * cc.x;
    const bc = _.image({ x: MIN(1.0, MAX(0.0, x - d)), y: uv.y });
    const b = 0.8 * bc.z + 0.2 * cc.z;
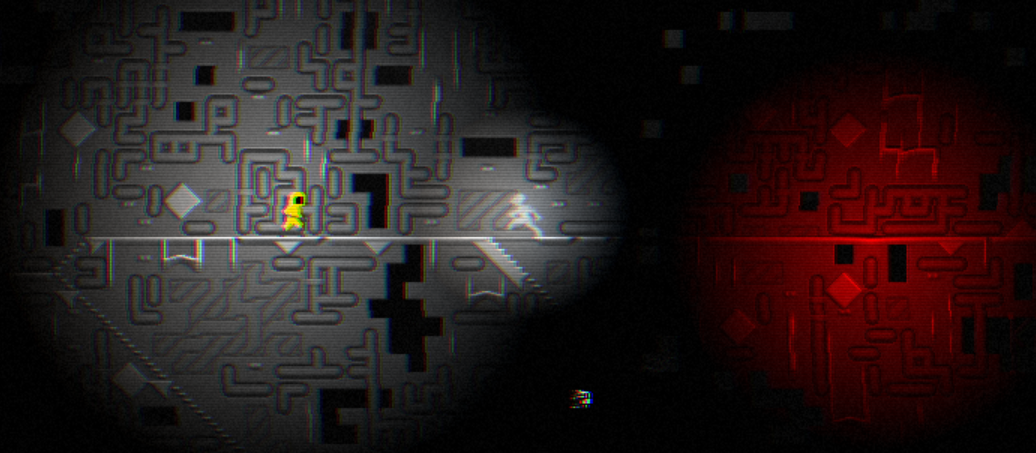
Cutting the original image into RGB channels that are shifted independently is cheap and very effective:

This gave me confidence that the ugliness of my sprites would be diminished by the post-processing.
Texture Atlas
Up until that point, I only worked with full-screen quads and pixel shaders, so I needed to add support for sprites. The usual way to achieve this is by collecting all the sprites together in a single texture, called a texture atlas. And then to draw a single sprite, to create a quad with XY coordinates placing it in the correct on-screen location and UV coordinates selecting the correct area of the atlas. Here's the atlas for The Metastructure:
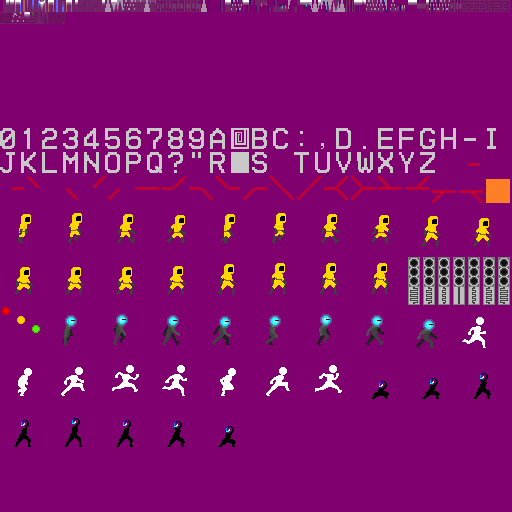
Rather than create it manually, I coded a quick tool inside the compiler (ImageLoader.cs and TextureAtlas.cs) that would be invoked by the SPRITE("xyz") statement in TSGL. The tool would find and load all images matching assets/xyz_*.png, place them into the atlas, and then return their metadata (UV coordinates and width in pixels).
The SPRITE("xyz") would generate a global array of sprites (the frames of an animation), and each sprite variable in TSGL would be compiled to an integer, with its properties being compiled as accesses into a global constant array: sprite.l would be stored at atlasCoords[sprite], sprite.r would be stored at atlasCoords[sprite+1], and so on.
The final piece of the sprite-rendering puzzle is how to fill the vertex buffers with the XY and UV coordinates, before passing them to the shader. I had already decided that TSGL would not have dynamic allocation, so arrays were out of the question. And even with arrays, I would need some kind of struct layout since the vertex buffer expects to contain array-of-structs data: X0 Y0 X1 Y1 … XN YN.
This is where the design of the TSGL TABLE becomes useful. Tables provide a way to have a variable-length collection of rows all sharing the same columns, with the guarantee that if all columns have the same type, then they are stored as an array-of-structs (which can then be passed to a shader as a vertex buffer). To keep things simple, tables only support appending at the end (which fails silently if the capacity of the table has been reached) and truncating the table (removing all contents).
The entire logic for rendering sprites is in the fairly short file atlas.ts. It even includes a feature for applying a left-right mirror reflection on sprites.
The Rail
The traditional way to implement a platformer is to keep collision information in the grid of tiles. The ground is made of tiles that have a top edge that prevents movement from the top down, but allows movement from the top up. The ceiling and walls are entire impassable squares. Each entity (including the player character) has a position within this grid, and can thus collide with the tiles, preventing them from clipping through walls and allowing them to stand on the floor.
This is very hard to get right when trying to procedurally generate the levels. Holes can become unexpected passages, and pits can become too wide to be jumped over (or with a piece of wall in the middle of the jump arc).
So, The Metastructure uses a rail instead. The characters always follow the rail. Procedural generation always starts with the rail, respecting some constraints (such as all rail pieces being connected with the player, not allowing adjacent rail pieces that aren't connected to one another, and so on), and only then can the actual tile selection begin.
Rails can be displayed (you saw the sprites in the atlas above), which really helps for debugging:
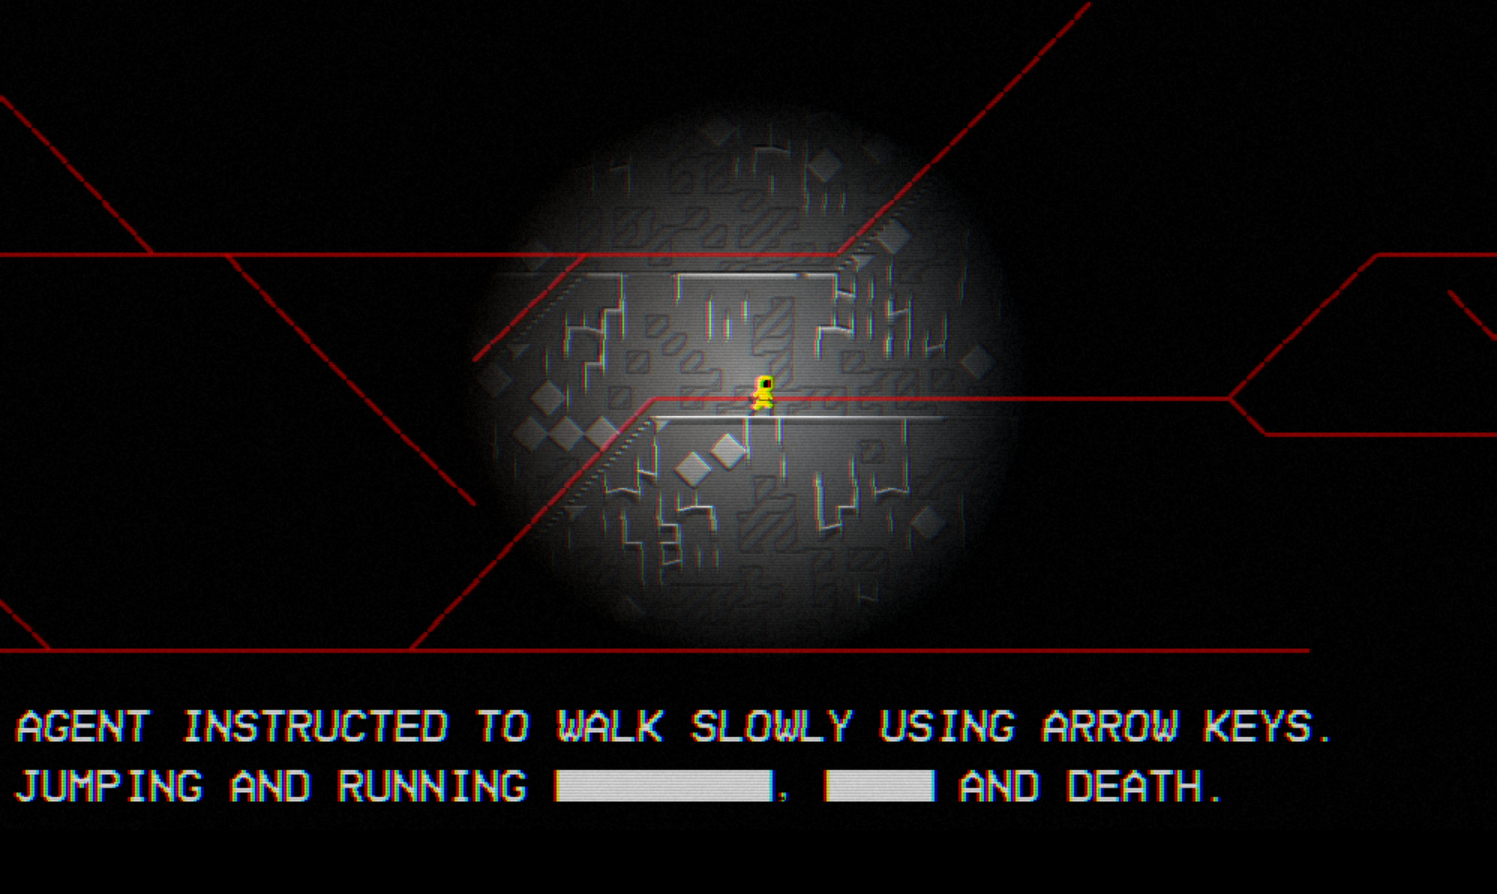
The message about "Jumping and running" was added because I wanted to explain why the character couldn't jump.
Every moving entity has its own code for following the rail (agent.ts, for example), but all of the rail generation, and the helper functions, are in rail.ts. In particular, since neither structs nor data structures are supported, I had to resort to bitwise operations and store information in bits instead:
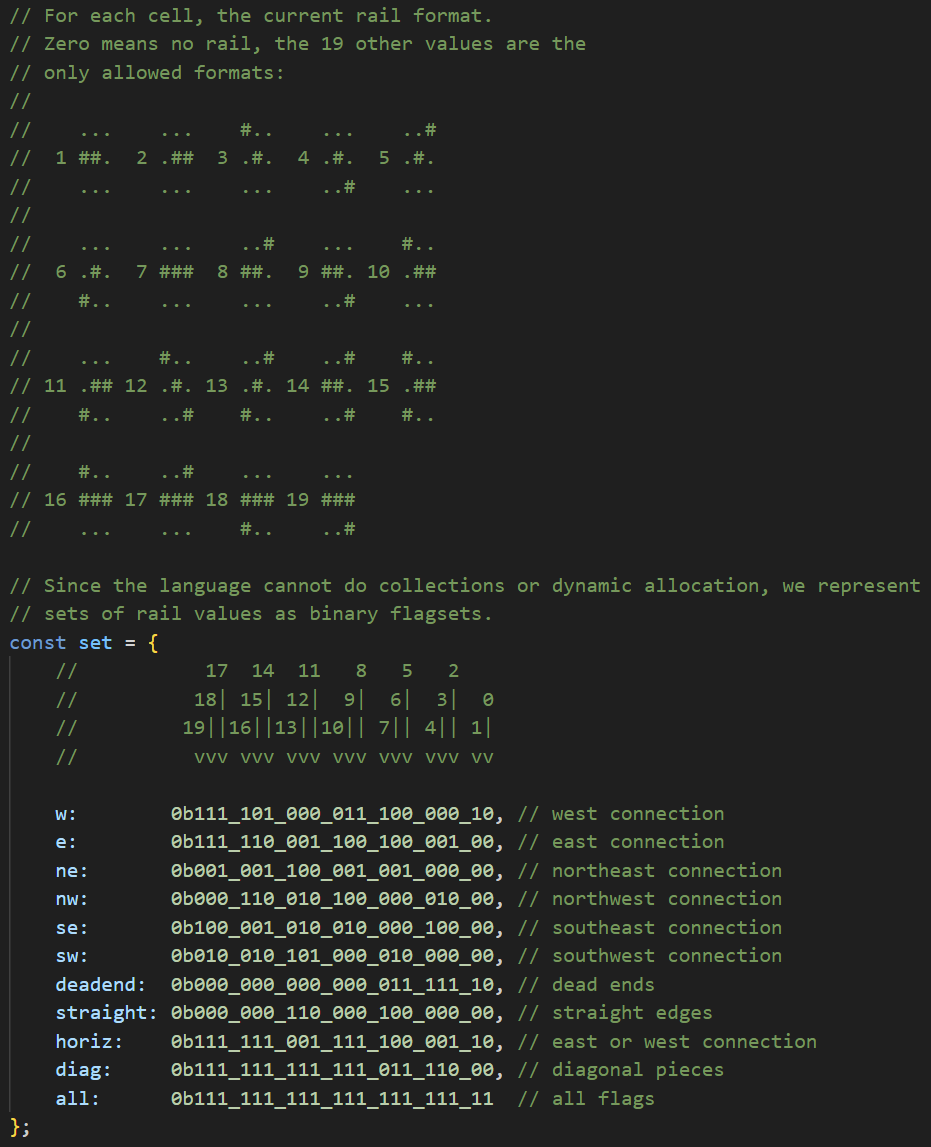
Wave Function Collapse
The rail grid is 24×24 pixels, and each cell is then subdivided into four 12×12 tiles, and those tiles are picked out of a tileset of 192 manually drawn. Since the actual wave function collapse algorithm involves some complex data structures and logic, I use instead a simpler algorithm based on cellular automata:
- Initially, all tiles are unset ; an unset tile can be connected on any edge with any other kind of tile.
- Traverse all tiles from the center outwards.
- If a tile is incompatible with one or more of its four neighbors, unset it.
- If a tile is unset, replace it with a tile that is compatible with all four neighbors and any rails nearby.
- If no such tile can be found, pick one or more neighbors at random, unset them (which means they become compatible with everything), and then try again.
Picking the neighbours at random is what prevents the system from ending in a local loop where two neighbours continually unset each other.
This algorithm takes up the first 480 lines of tiles.ts. Since the language has no structs, the information of which neighbours should have which edges is instead stored in an int32 using bit shifts:
const fullKey = (flags << 24) | (nkey << 18) | (skey << 12) | (wkey << 6) | ekey;
This supports up to 63 different edges (and the sets for the up-down and left-right edges are distinct), plus 8 "flags" bits that are used for rail-tile compatibility.

Above is tile 146, magnified and with yellow lines added to illustrate the various tile sections. The center square section is 12×12 and it represents the data that will actually be drawn (this is the portion that is included in the texture atlas). The top left and top right corners are ignored, and the bottom left and bottom right corners are ignored unless they're blue ; blue corners indicate a staircase (going up in the direction where the blue corner is found). The four remaining 1×12 edges are used to build a compatibility matrix between the tiles. Two tiles are compatible if they have the same edge. For example, this tile is compatible with itself horizontally, but not vertically.
All of this is implemented in the compiler in Assets/Tile.cs, and exposed to the language through function EDGES(tile) which returns the bit-packed edges and flags of the tile passed as argument.
And since tileset edges are numbered, I could code the different "levels" of the game by allowing only a subset of the edges:
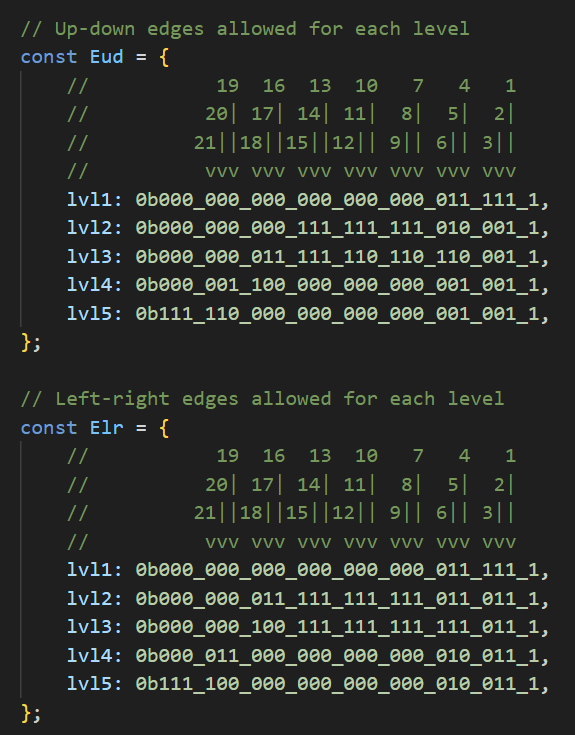
The second half of tiles.ts is for rendering the tiles. The current grid of tiles is passed as an array of 2048 Vec4 (one for each cell in the 24×24 grid, containing the ids of its four 12×12 tiles), and the pixel shader determines what tile contains the current pixel, loads the corresponding pixel from the tile atlas, and draws it.
The tile atlas contains tiles as 3×12 texel entries, by packing four tile pixels into the RGBA components of a single atlas texel. This is because the tiles are in fact heightmaps, with pixels representing heights (1..255) instead of colors, and they are drawn to a heighmap texture that will never be shown on the screen.
Instead, the heighmap texture interacts with the lighting system. By calling addLight, the game draws an octagon around the light's center, and it determines the brightness of each pixel using:
- The distance to the light's center, as attenuation.
- The normal vector of the tile pixel, based on its height and the height of its eight neighbours (as read from the heightmap).
- An occlusion factor for the tile pixel, depending on how many of its neighbours are taller than it (as read from the heightmap).
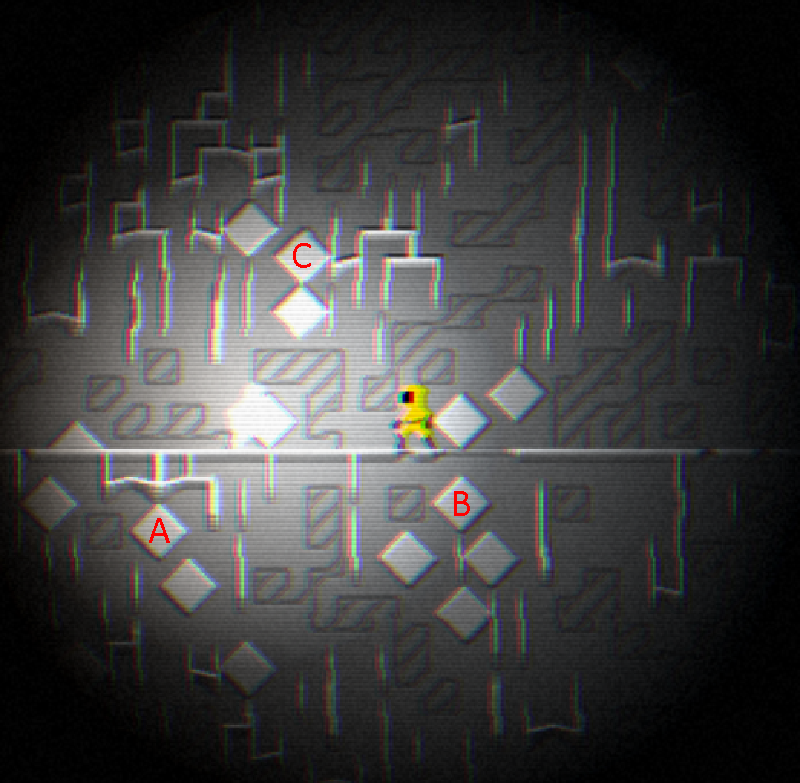
In the image above, diamond A is lit from the top right, diamond B is lit from the top left, and diamond C is lit by two light sources, one from the bottom left and the other from the bottom light.
Two nasty "bugs" I encountered while implementing this feature:
- I discovered that in PNG, you cannot store an arbitrary RGBA pixel if the alpha is 0: the RGB portion will be discarded. So, my idea of packing four bytes into one pixel required a little adjustment of treating values 0 and 1 as identical, and storing 1 in the alpha channel instead of 0.
- It's not possible to pass 2048 Vec4 values through an uniform array, the actual maximum is closer to 224. Oops. Good news, I could add support for Uniform Buffer Objects to work around this, but it could have created a huge delay in implementing the tiles.
The Enemies
By this point, it's Thursday morning, with only three days left, and at this point the game is just about exploring an empty random world.
The Luminous Runner was the first addition. It spawns at a random position on the rail (outside the player's range of lighting). When lit by any light source, it gains energy and becomes brighter and brighter. At some point, it starts running towards the player (each rail cell knows its distance to the player, so it's just a matter of following the gradient) and is faster than the player, so it cannot be outrun. When no longer lit, it loses energy until it can no longer move, and even disappear. When the player has moved far enough away from it, it re-appears somewhere closer.
So, there's a winning strategy of just walking around with the flashlight off.
The Haunting Shadow was the second addition. It spawns at a random unlit position on the rail, usually very close to the player. Walking into the shadow in the dark is fatal, so this breaks the strategy of walking around with the flashlight off.
As a little bonus, when the shadow is within view, turning the lights of causes it to immediately teleport away, adding a bit of a freaky ghost vibe.
A design problem with the shadow was that is was originally completely black, and so it wouldn't be visible at all when on a dark background (such as the moonlake sky). At this point, I replaced its head with a spiral-tentacle-thing with a glowing blue bit.
The Red Light - Green Light was the third addition. It appears on a random piece of horizontal rail, and glows green, yellow, then red. Moving in the red light kills the player. The main design idea here was that I wanted something that could provide some light to the scene beyond the player's flashlight. Originally, it would appear anywhere, but this meant it was too far away to interact with the player, so I made it appear on rails only. Its texture became an inspiration for the Spiral Fractal background textures (well, that and Junji Ito's Uzumaki).
The Moonstalker was the final addition, it spawns on a rail outside the screen and slowly walks towards the player. As an enemy, it plugged the gaps between the other three. It's the only obstacle that you cannot reliably pass through (you can rush past it, but it will sometimes catch you anyway), and the only obstacle that moves on its own, making Red Light - Green Light more dangerous. It provides its own light, which triggers the Luminous Runner. And I think it looks cool.
Conclusion
I managed to write such a complex game precisely because I didn't have to account for coming back to the code later. Both the game and the compiler are extremely messy, and many parts will crumble down at the slightest breeze. So, I don't expect I will be working on the project again, or cleaning up, or creating a clean version.
Still, it was nice being able to add my own creations to the storytelling commons. Maybe I'll encounter the Metastructure or the Moonstalker in some other media someday.
And thank you to Austin Z Henley for coming up with the idea of the Langjam Gamejam!